
My Portfolio is the place on ZAPP where you upload and store artwork images, booth shots, files, and saved statements that you plan to use when applying to events. Rather than uploading these materials directly to each application, you can upload them once in your portfolio and use them when applying to any number of events. To upload, edit, or review application materials in your portfolio, click Portfolio in the header or from the menu after you log in.
My Portfolio: Uploading Images & Saving Statements
What is My Portfolio?
Uploading & Editing Media
You can upload artwork images, booth shots, or documents and other files to your ZAPP portfolio. Click the section below to see how to upload each type of media to your portfolio.
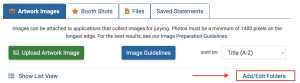
Artwork Images: Images can be attached to applications that collect images for jurying. These images must meet system requirements.
Booth Shots: A booth shot is a photo of your booth display that shows an example of how you will exhibit your artwork during the event.
Files A file is a document or non-artwork image that can be added to your application if an administrator requests it on the application.
Artwork Images
ZAPP has minimally restrictive specifications to help ensure images uploaded to your portfolio are of high enough quality for shows to use in their jury process. Below are our minimum and recommended image specifications.
Some applications do not collect artwork images. If the application you are completing does not require images, you do not need to prepare and upload images to ZAPP.
Minimum Image Requirements
- Dimensions: 1400 pixels on the longest side
- File Format: jpeg, jpg, tiff, png
- File Size: Under 5 MB
Recommended Image Requirements
- Dimensions: 1920 pixels on the longest side.
- File Format: jpeg, jpg, tiff, png
- File Size: Under 5 MB
- Resolution: 72 ppi – 300 ppi
- Color space: sRGB
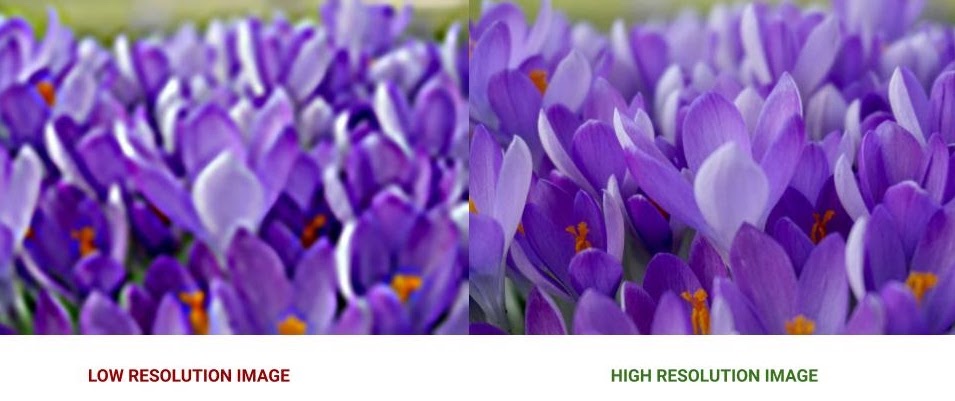
Pixels are the smallest elements combined to make up an image that also determine the photo’s resolution. The more pixels in the image file, the higher the resolution.
Resolution refers to two things. The first is the number of pixels that are combined to make up your image. The second is how the number of pixels are distributed. This is usually expressed as “dots per inch” or “pixels per inch” — dpi or ppi. When uploading your images to ZAPP, a resolution of 72 ppi is adequate for viewing your images on a computer monitor; however, if a show intends to use your image(s) to print for show materials, they will typically want resolutions set to 300 ppi. Similar to pixels, the higher the ppi, the higher the resolution.
If your image is larger than 5 MB, it will be too large to upload to ZAPP. Don’t worry — reducing the size of your photo is simple. The process is slightly different depending on your computer, but you can click here to review a general guide or you can use a photo editing program to reduce your image’s file size.
When you enlarge images in Photoshop, Preview, or any other photo editing software, to meet the minimum requirements for ZAPP, you will likely see a reduction in the image quality. Adding black borders to make your images larger is the best way to meet ZAPP image requirements without compromising the quality of your images.
Click here for a tutorial on adding black borders using the free software Pixlr. If you don’t want to use Pixlr, you can use nearly any photo editing platforms to resize your images and/or add black borders.
ZAPP encourages artists to use professional photographers to document their artwork when possible. Using professionals helps to ensure your digital images present your work in the best way possible, with proper lighting, image composition, and resolution. You can visit a list of professional photographers on our Resources page. You may also wish to view the posts Tips for Photographing Your Artwork and How to Take a Great Booth Picture.
Uploading Images
To upload an artwork image to ZAPP, follow these steps:
- Within your Portfolio, click the “Artwork Images” tab and click “Upload Artwork Image”.
- Select “Browse” to upload an image from your computer or phone. Fill in the image title, price, height, width, and depth, and the artwork’s medium type. You may also enter the year the artwork was completed, a short description, add a tag, add an internal comment, or add the image to a folder.
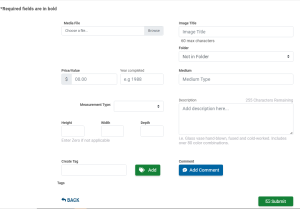 Please note only files that meet our image requirements will upload.
 - Click “Submit” to upload your image.
Booth Shots
Minimum Image Requirements
- Dimensions: 1400 pixels on the longest side
- File Format: jpeg, jpg, tiff, png
- File Size: Under 5 MB
Recommended Image Requirements
- Dimensions: 1920 pixels on the longest side.
- File Format: jpeg, jpg, tiff, png
- File Size: Under 5 MB
- Resolution: 72 ppi – 300 ppi
- Color space: sRGB
To upload a Booth Shot to ZAPP, follow these steps:
- Within your Portfolio, select the “Booth Shots” tab and click “Upload Booth Shot”.

- Select “Browse” to upload an image from your computer or phone and enter your image title. You may also add a tag, add an internal comment, or add the image to a folder.
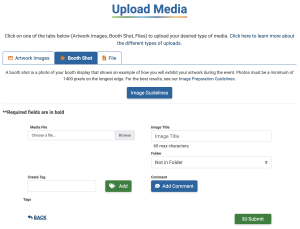
- Please note only files that meet our image requirements will upload.
Click “Submit” to upload your booth shot.
Files
File Requirements
A file is a document or non-artwork image that can be added to your application if an administrator requests it on the application.
- File Size: Under 5 MB
- File Format: PDF, DOC, DOCX, XLS, XLSX, CSV, JPG, JPEG, PNG, TIFF.
To upload a File to ZAPP, follow these steps:
- Within your Portfolio, click the “Files” tab and click “Upload File.”
- Select “Browse” to upload a file from your computer or phone. Enter your file title. You may also add a tag, add an internal comment, or add the file to a folder.
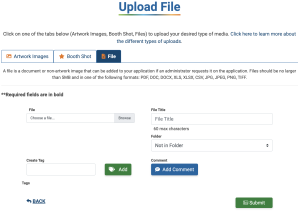
- Click “Submit” to upload your file.
Editing Images
To edit, copy, or delete images and image information uploaded on ZAPP, click on the thumbnail of the image you want to edit.
On the View Media page, you have the option to copy, edit, or delete the image. You can also see all image information and you can view an enlarged version of the image by clicking on the image. Once in the enlarged image view, you can return to the View Media page by clicking the “X” in the upper right hand corner.
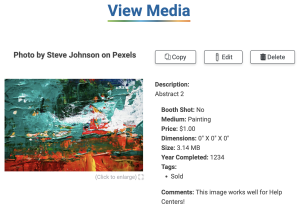
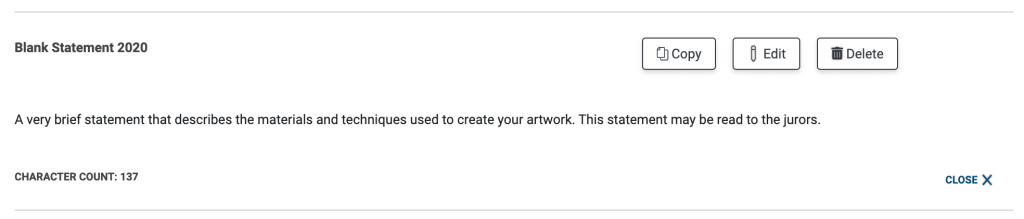
If you click the “Copy” button, ZAPP will copy the image and its information. The title will be the title you originally entered with the word (Copy) after it.
If you click the “Delete” button, ZAPP will delete the image and its information. The image and its information will not be deleted from any applications submitted.
If you click the “Edit” button, you will be able to update any image information or replace the image with another image. If you accidentally marked artwork as a booth shot or vice versa, you can update that information by editing your image.

After you have made changes to your image and its information, click “Submit” to save your changes. Any edits made will not be reflected on applications submitted before the changes were made.
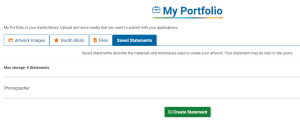
Statements of Technique
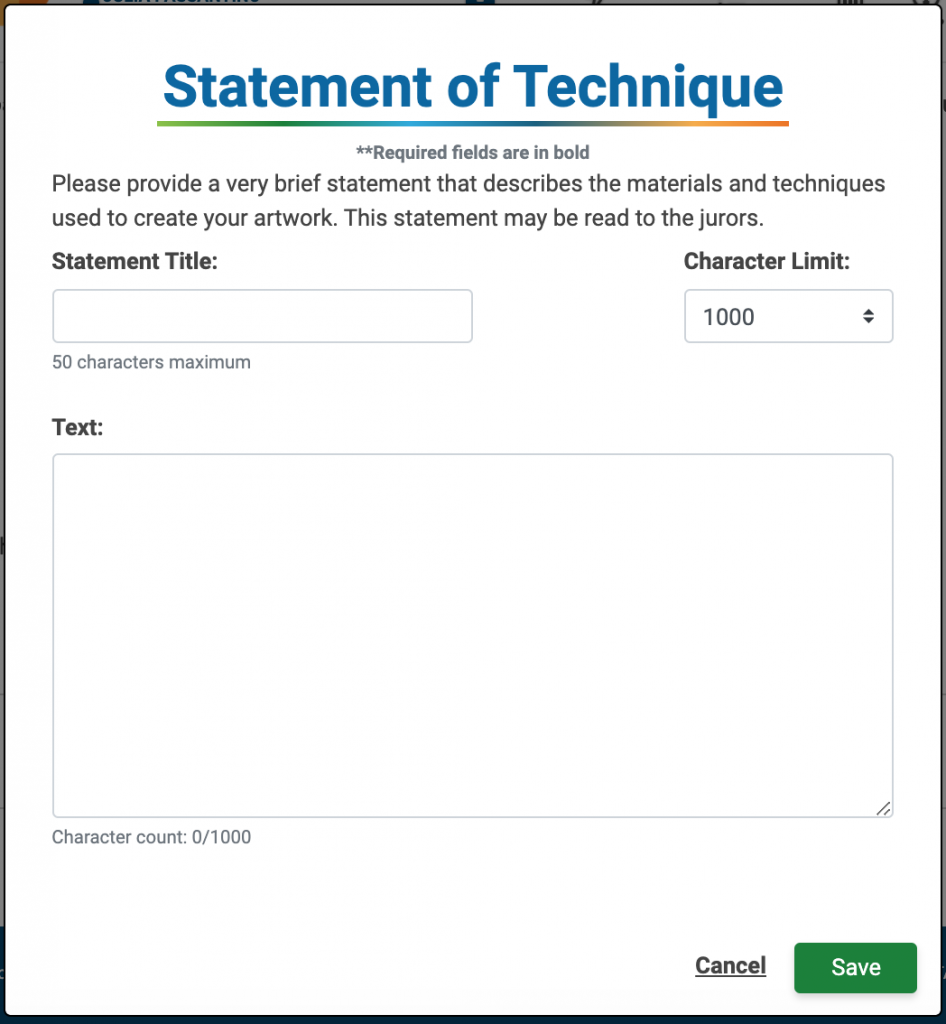
Within your Portfolio, you can also save up to six Statements of Technique. Every application on ZAPP will ask for a Statement of Technique, though the length of the statement allowed may differ. Your statement of technique should describe the materials and techniques used to create your artwork. Jurors may have access to your Statement of Technique.
To create and save a Statement of Technique, click on Saved Statements from the Artist Portfolio and click the “Create Statement” button.
Clicking the “Create Statement” button will open the Statement of Technique editor. You will be prompted to title your statement and choose the character limit. Since events have different character limits for these statements, saving multiple statements at different character limits will allow you to more easily insert them into applications.
Once you have saved a statement of technique, you can edit, copy, or delete the statement by clicking on the dropdown arrow on the Manage Statements of Technique page and then selecting the button for the desired action:
To learn about attaching images and statements to applications, view Applying to Events on ZAPP.
A very brief statement that describes the materials and techniques used to create your artwork. This statement may be read to the jurors.
Organizing your Portfolio
Within each section of your portfolio, you can stay organized by adding folders, tags, and internal comments. You can also adjust the display of your media by choosing to display as a grid or in list view.
Adding, Editing, and Deleting a Folder:
- Click the “Add/Edit Folders” link.
- Click the “Add Folder” button. Enter a folder name (e.g. 2022 images), select a Parent Folder if you would like to place the new folder inside another, and click “Save”.
- To modify the folder name or parent folder, click “Edit.” Update your information and click “Save”.
- To delete a folder, click “Delete.” Then select to either:
- “Delete Folder But Preserve Contents” – This will remove only the folder but not the media within it.
- “Delete Folder and Contents” – This will delete the folder and all contents inside. This action cannot be undone.
Adding Tags and Comments:
- Select any uploaded media file by clicking the thumbnail.
- Click the “Edit” button
- Create a tag by entering 1-12 alphanumeric characters without spaces. Click “Add.”
- Add a comment by clicking “Add Comment.” Enter up to 250 characters and click “Update.”
- Be sure to click the green “submit” button to save your changes.
Sorting Your Portfolio:
From the Sort By drop down list, you can sort your uploaded media by the following:
- Title: The title entered for the image (A to Z or Z to A)
- Image Price: The value entered when uploading the image. Only applicable to artwork image uploads. (Low to High or High to Low)
- Year Created: The year entered when uploading the image. Only applicable to artwork image uploads. (Oldest to Newest or Newest to Oldest)
- Date Uploaded: The date the media was uploaded to ZAPP. (Oldest to Newest or Newest to Oldest)